- School District of Marshfield
- Technology Learning Resources
iPad Guides & Resources
-
Fix Connection Issue on iPad
5 Steps to Fix Connection Issue on iPad
Open the “Settings” App on your iPad
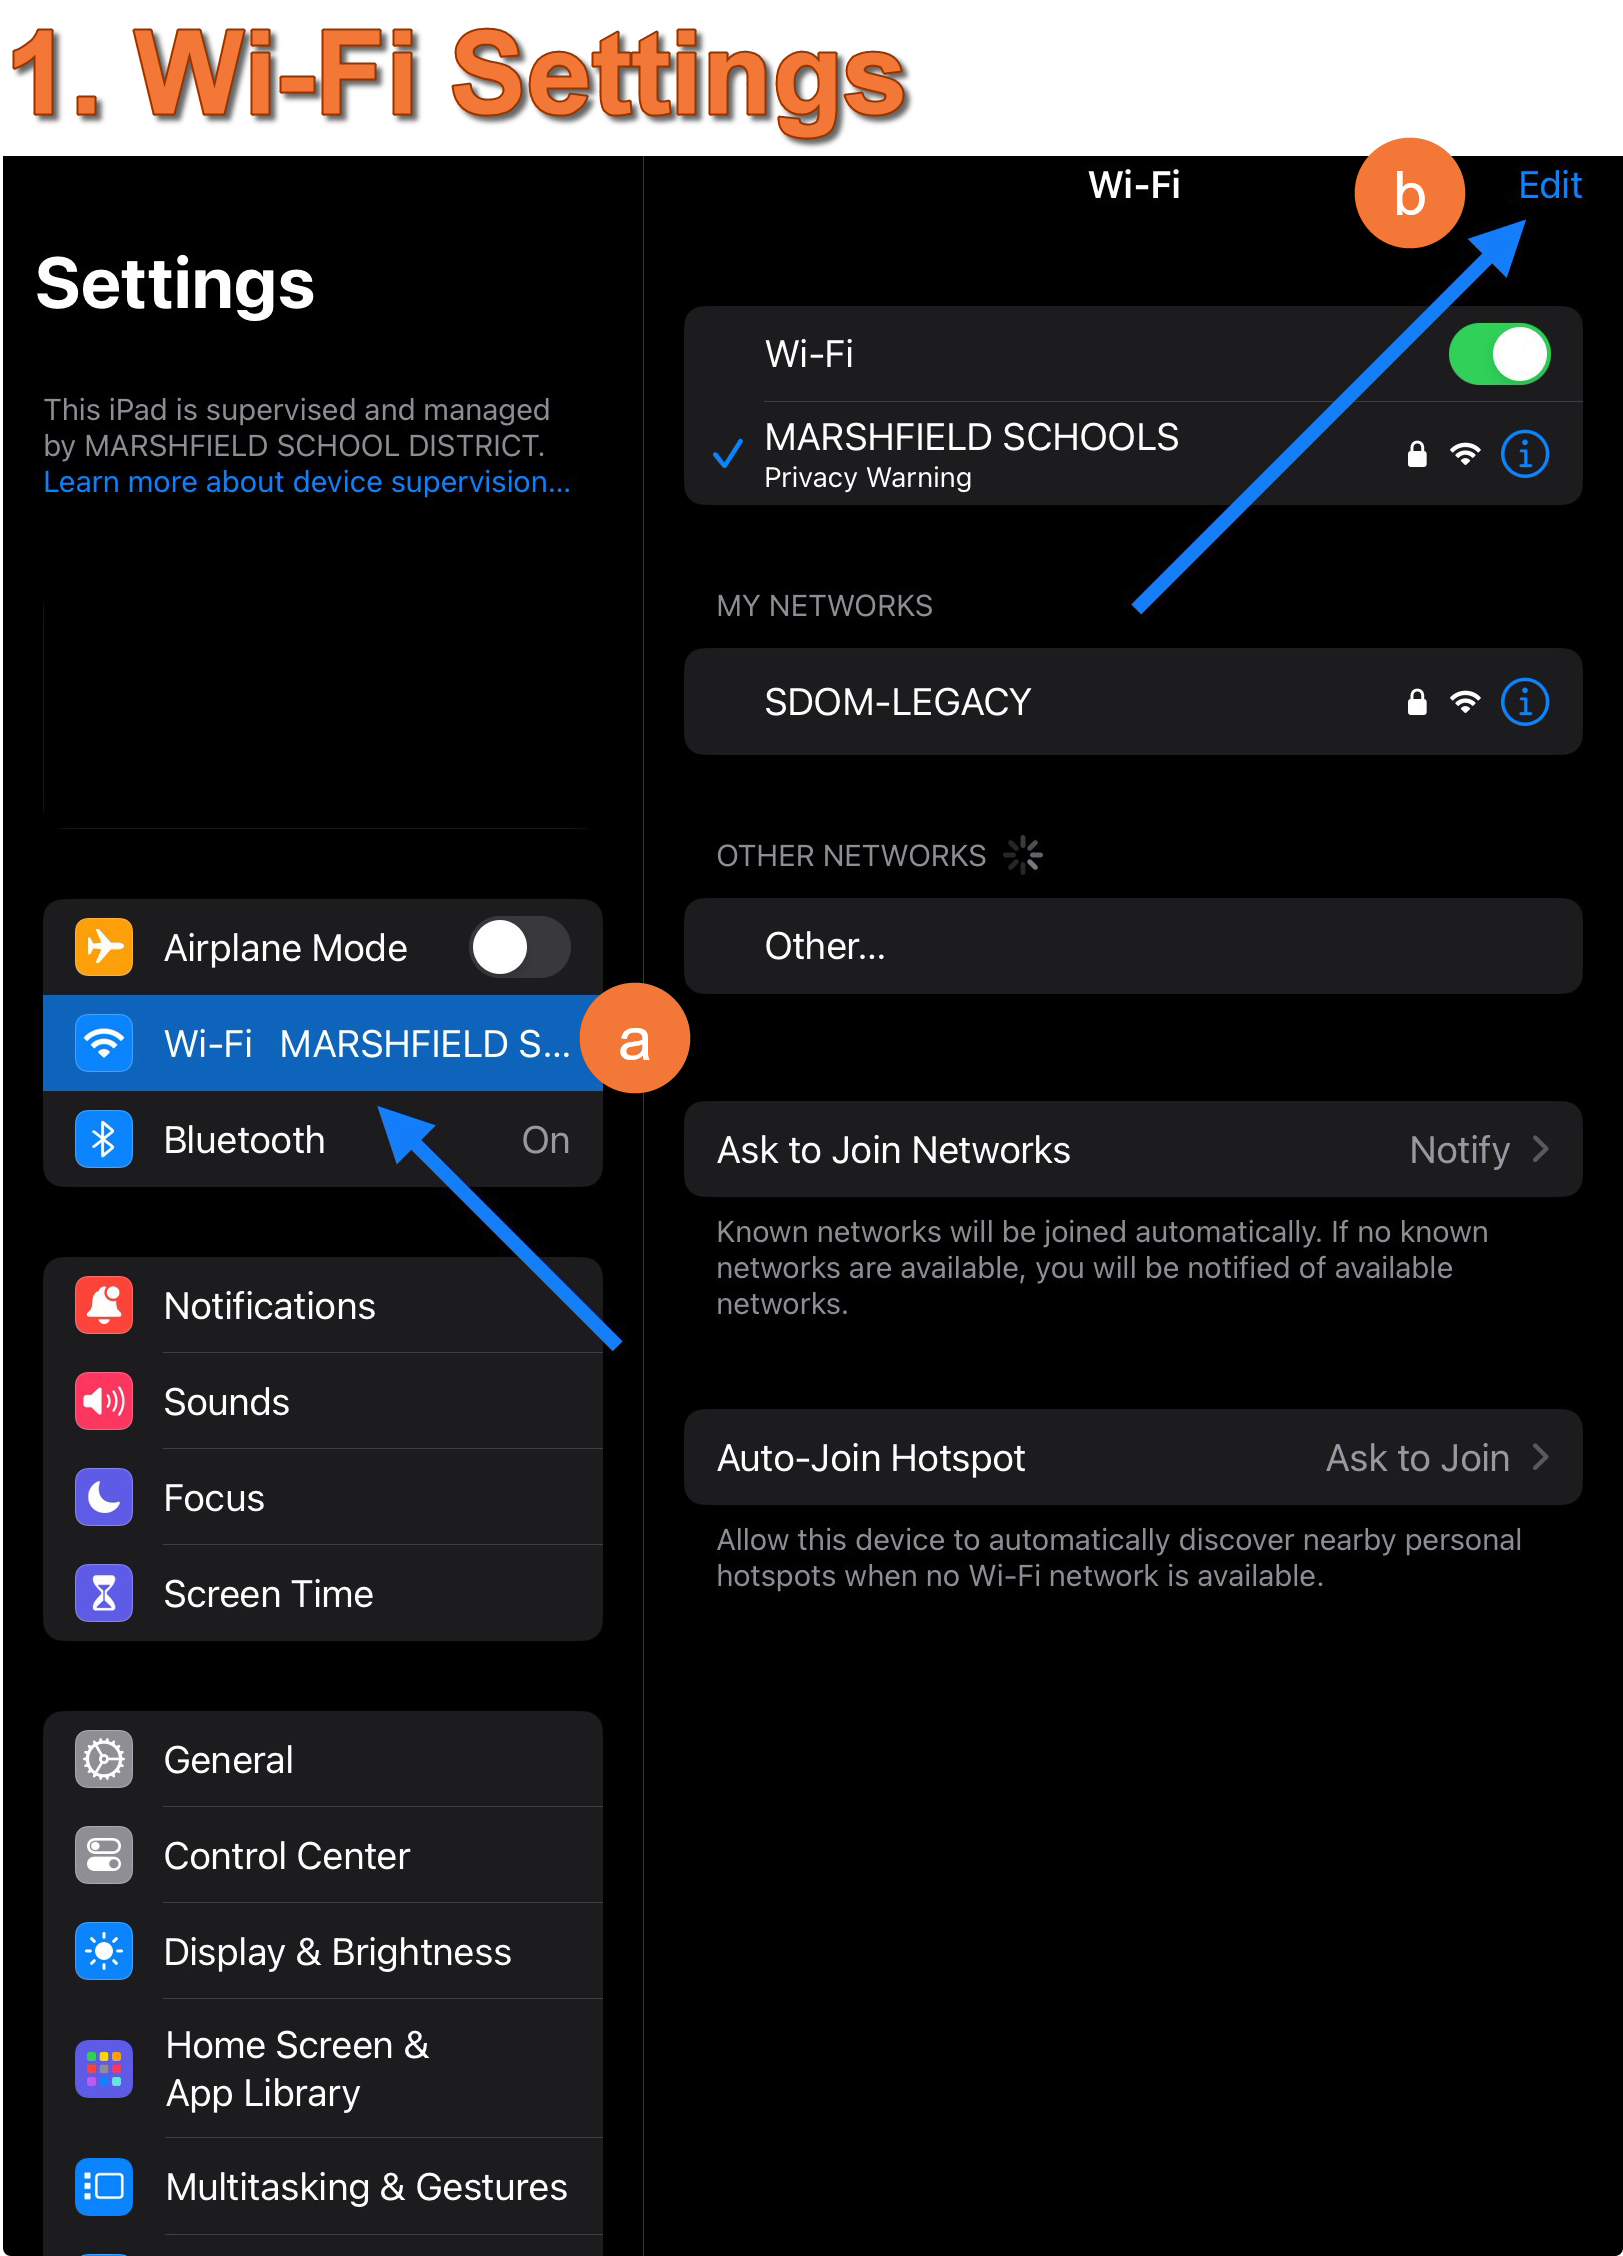
1. WI-FI SETTINGS
- Navigate to the "Wi-Fi" option on the left-hand side.
- In the upper right corner, select "Edit".
- Enter your passcode as prompted.
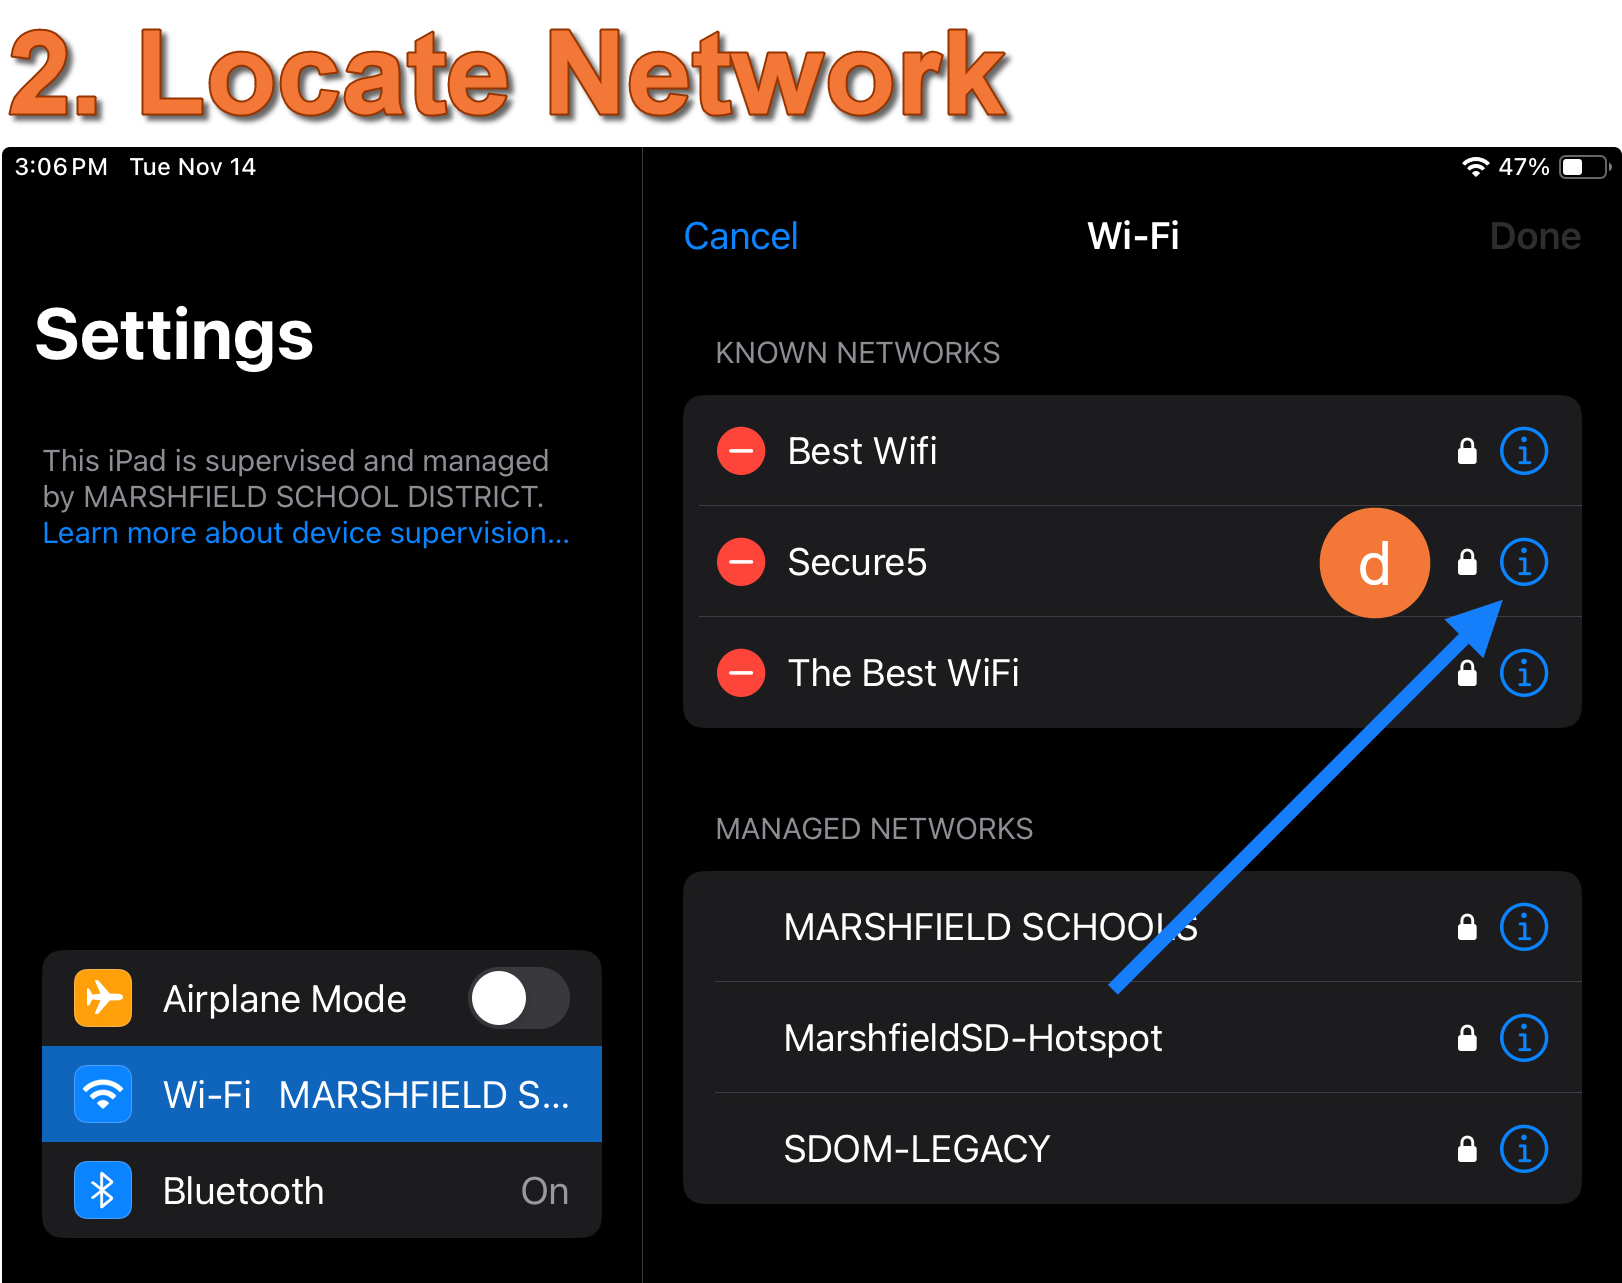
2. LOCATE NETWORK
- Locate the network you are unable to access and tap the information (i) icon next to it.
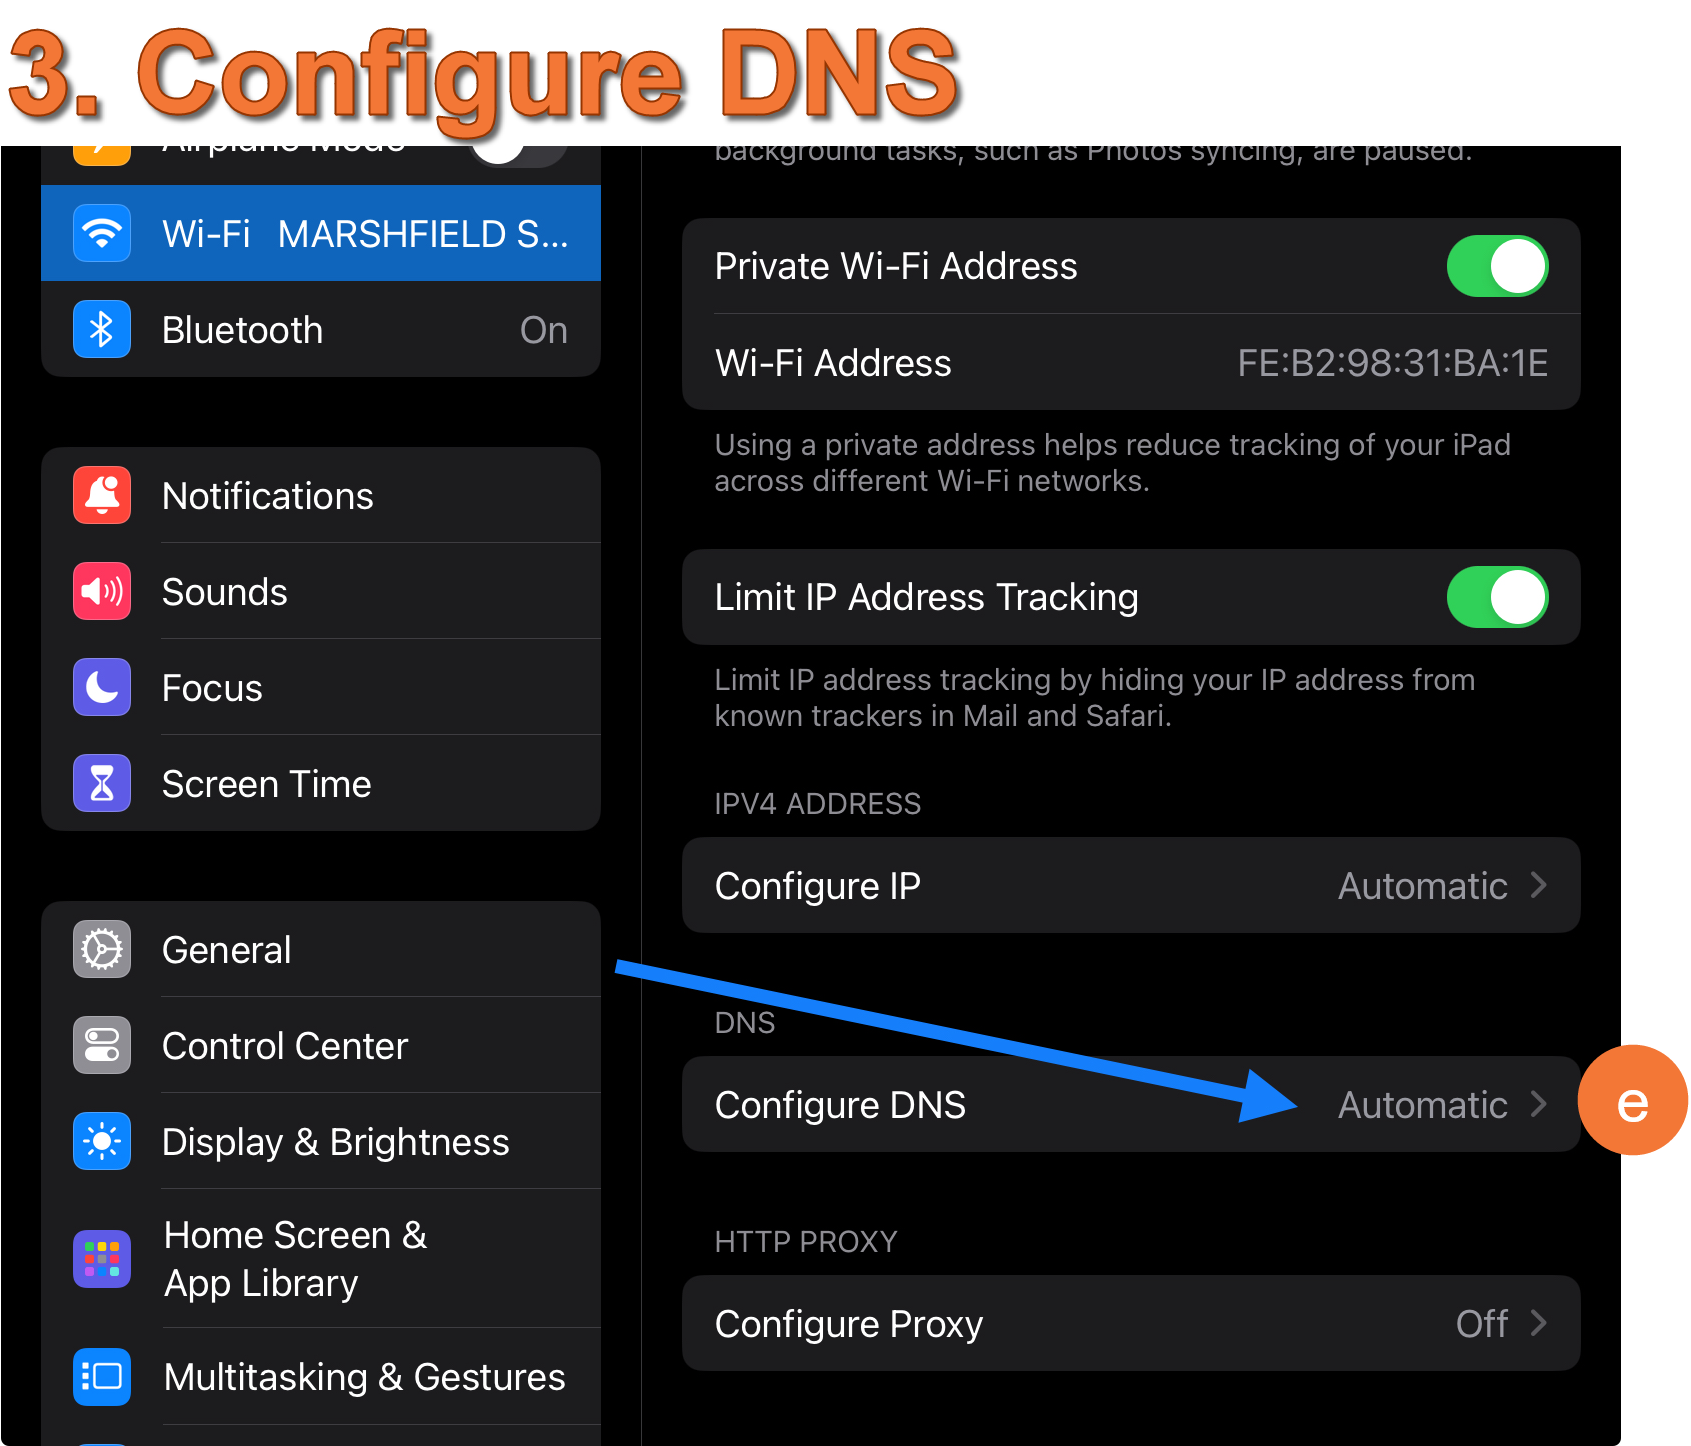
3. CONFIGURE DNS
- Select "Configure DNS".
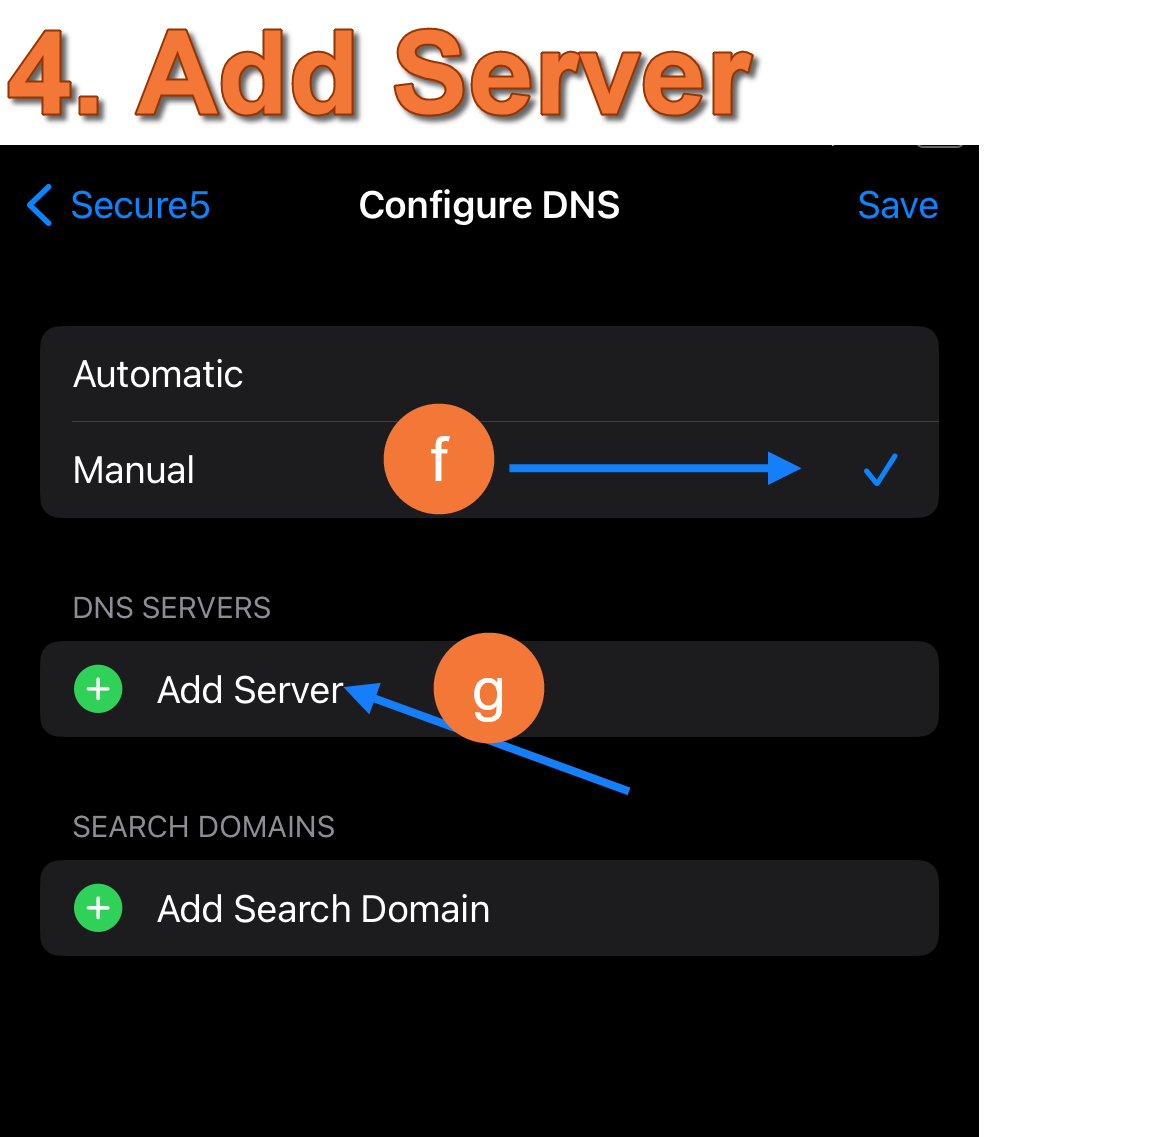
4. ADD SERVER
- Choose the "Manual" option.
- Under "DNS Servers", tap the "+" icon.
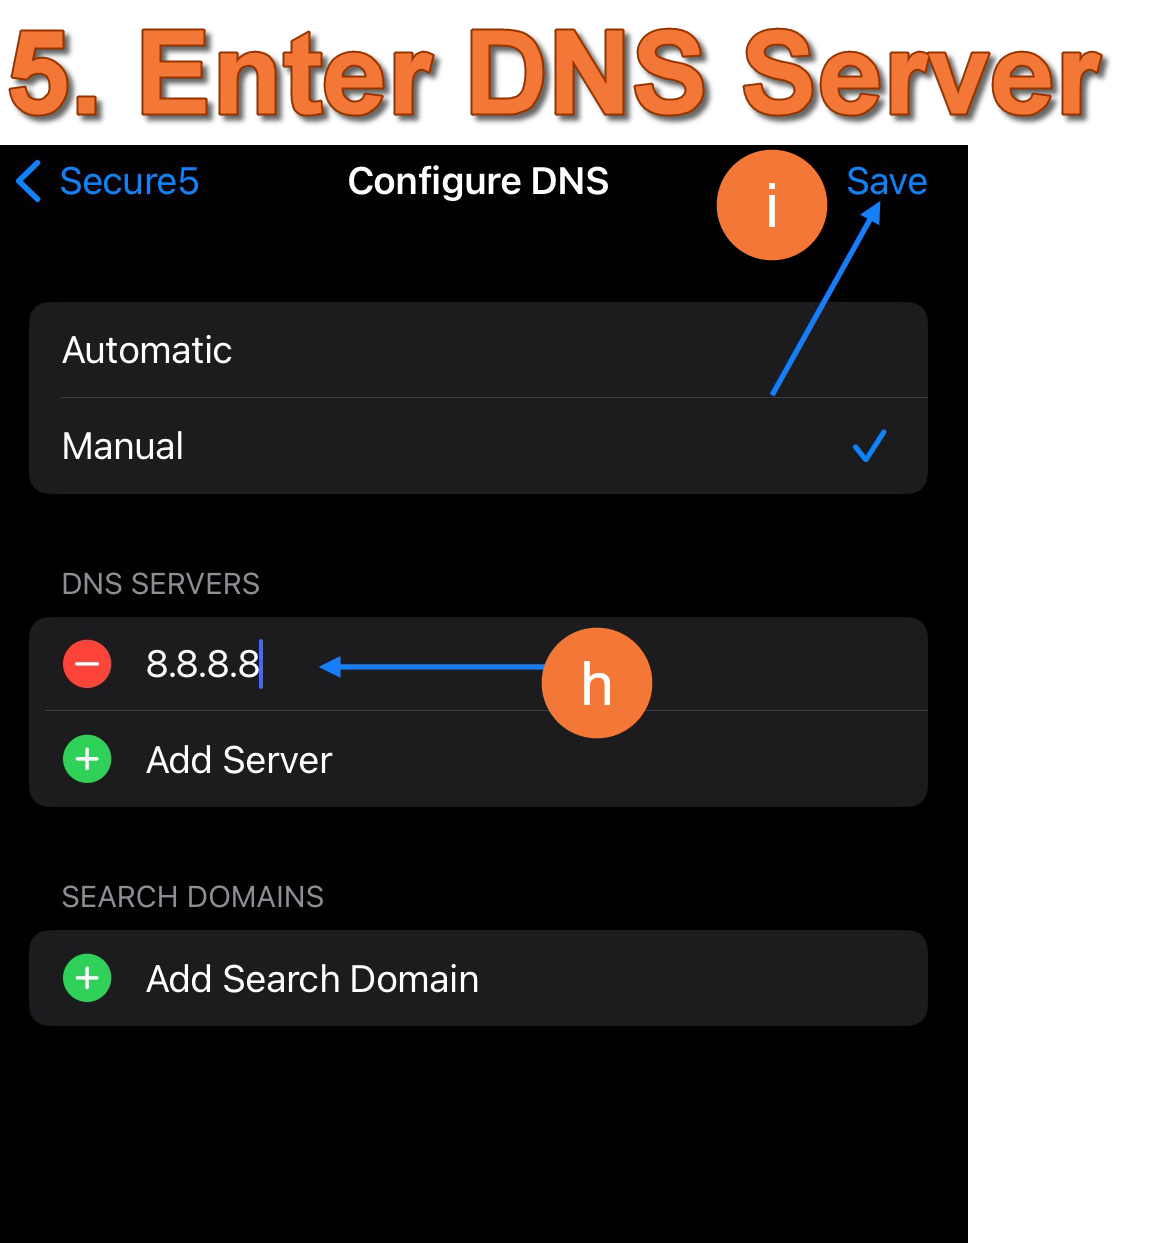
5. ENTER DNS SERVER
- Enter "8.8.8.8" as the DNS server.
- Tap "Save" in the upper right corner to apply the changes.
-
iPad Setup Directions (iOS 17 or later)
iPad Setup: iOS17
1. Power On the iPad:
- Press and hold the power button located on the top right of the device, until you see an apple.
2. Set Language and Region:
- Press the home button at the bottom center of the device.
- Select "Language" and choose "United States."
3. Appearance:
- Personalize text and icon size using the slider.
- Tap " Continue " to proceed.
4. Quick Start:
- Choose "Setup Without Another Device" at the bottom.
5. Connect to Wi-Fi:
- Select "MARSHFIELD SCHOOLS" from the list.
- Enter the case-sensitive password "marshfield".
- Tap "Join" and allow the iPad to configure (approximately 1-2 minutes)
6. Remote Management:
- Tap " Enroll this iPad "
7. Sign in with District Credentials:
- For Students: Use your full email address
([OTHER ID#]@my.marshfieldschools.org) and password
(Mfld[LUNCH PIN])
- For Staff: Provide your full email address and password.
8. Wait for Configuration:
- Allow the iPad to complete the configuration process.
9. Create iPad Passcode:
- Tap "Passcode Options" and select "4-Digit Numeric Code."
- Enter your lunch code and verify.
- Note: Your passcode is set to your lunch code according to the student handbook. This choice aids in easier troubleshooting and prevents data loss in case of lockouts.
10. Enable Location Services:
- Click " Enable Location Services " when prompted.
11. Select Display Option:
- Choose between Light, Dark, or Auto.
- Click " Continue "
12. Final Steps:
- Congratulations! Your iPad setup is complete.
To ensure your iPad functions optimally, there are a few additional settings you may need to adjust. Please follow the provided instructions for optimal performance.
iPad Settings: iOS 17
Safari Settings
- Open Settings App
- On the Left: Tap “Safari”
Toggle OFF
- “Block Pop-Ups”
- “Prevent Cross-Site Tracking”
Camera & Video Settings
- In Settings App
- On the Left, Tap “Camera”
- Tap “Formats”
- Select “Most Compatible”
- Tap “< Camera” to exit the “Formats” screen
- Tap “Record Video”
- Select “720 HD at 30 fps”
Outlook Email Setup
- Tap the “Outlook” App
- Select “Add Account”
- Tap “Open Authenticator”
- If prompted: Enter District Credentials
- Tap “Sign In”
- Tap “Maybe Later”
- “Enable Notifications” Pop up-Choose an Option
- “Outlook would like to send you notifications” Pop Up-Choose an Option
-
iPad Overview-Know Your Device
-
iPad Setup Directions (iOS versions before 17)
iPad Setup (iOS versions before 17)
Let's get started!
- Turn on iPad > Push home button > Select Language & United States
Set Up
- Tap "Set Up Manually"
- Select Wi-Fi Network & Sign in
- Tap Join
- Tap Trust
If you are using home or public Wi-Fi, you will need those credentials to sign in. Sign in to the SDOM Wi-Fi network with your district credentials if you are at school.
Remote Management
- Remote Management Screen
- Tap Next
- Sign in with district credentials (Use your full email address)
- Tap Next
Create Passcode
- Tap Passcode Options
- Staff can choose to do a 6 or 4 digit code,
- Student must Tap 4-digit numeric code
Enter lunch #, Twice
Location Services
- Tap Enable Location Services
Appearance
- Selected Preferred Appearance
- Continue
Apps will automatically download. Staff have access to hundreds of district approved free apps though the District's own “app store” called Self-Service. The app store will also be downloaded. You may download apps from there. You can create a district Apple ID
-
iPad Reset Directions
iPad Reset
iPad Directions: Resetting iPad
BACK IT UP!
- Save any photos, videos, notes, typed work, ect. that you would like to keep to a cloud-based service such as Google Photos, Google Docs, or OneDrive
Sign out of iCloud
- Go to: Settings
- Tap on your name/image
- Tap "Sign Out"
Reset iPad
- Go to: Settings
- General
- "Transfer or Reset iPad:"
- "Erase All Content and Settings"
- Tap "Continue"
- Enter your Passcode
- Tap "Erase iPad"
You are done!
-
iPad Troubleshooting
iPad App Troubleshooting
General Troubleshooting
App not working right?
- Check for an update!
- Settings
- General
- Software update-if there is an update download and install it
- Make sure location services are enabled.
- Settings
- Privacy
- Location Services-should be set to “On”
- Make sure you are logged into Office 365.
- Close out of all apps
- Go to Marshfieldschools.org in Safari web browser
- Click My Apps
- Log in
- Go back to Application and try again
- Do a hard reset on the device.
- Hold down the top power button along with the home button until the Apple logo appears on your screen, then let go of both buttons.
- This will fully restart your iPad.
- Try closing the app ALL THE WAY, then reopening it
- Close out other background apps, these sometimes interfere
- Is an online version of the app? Try to use it online to see if it is working there
- Check https://downdetector.com (Links to an external site.) to see if it is a larger issue
- Make sure you are on the correct Wi-Fi, being connect to the guest network may cause issues with applications
- Erase all Content and Settings
- The final step should only be performed if all else fails. Beware that this will remove everything from your iPad, and you will have to start fresh. Be sure to back anything up to a cloud location such as Microsoft OneDrive or Google Drive before doing this.
- Hold down the top power button along with the home button until the Apple logo appears on your screen, then let go of both buttons.
Internet Doesn’t seem to be working?
- Check to see if you are connected to a network
- Settings
- Wi-Fi-in district should be connected to “SDOM”
- connecting to other networks, such as SDOM-Guest may cause issues with Apps
- Reset your Network Settings
- General
- Transfer or Reset iPad
- Reset
- Reset Network Settings
- Enter your passcode
- Click Reset
- The apple logo will appear along with a loading bar
- The screen may go black for a few seconds then show the apple logo for a second time.
- Make sure the following are turned off
- Prevent Cross site Tracking
- Block All Cookies
- Block Pop Ups
- Check for an update!
-
Printing from District iPad
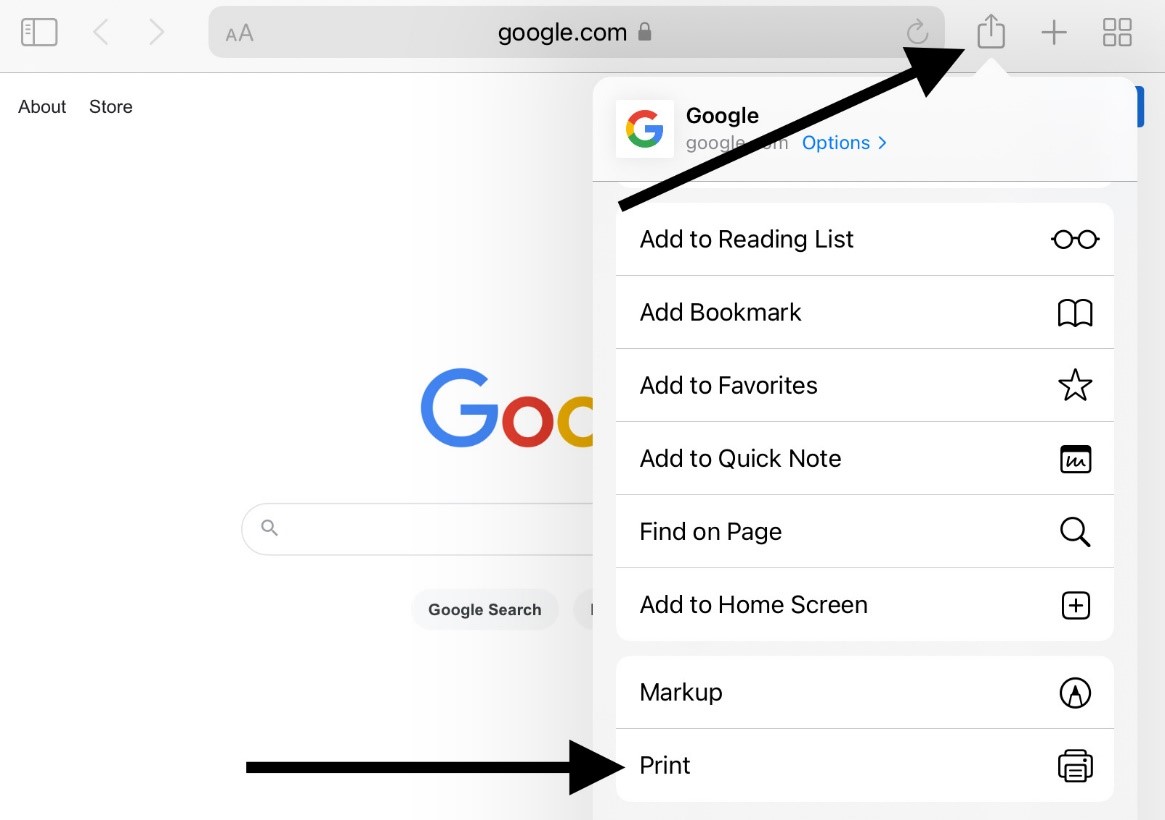
Step 1
From the iPad toolbar, select "Sharesheet"

Tap "Print"
Step 2
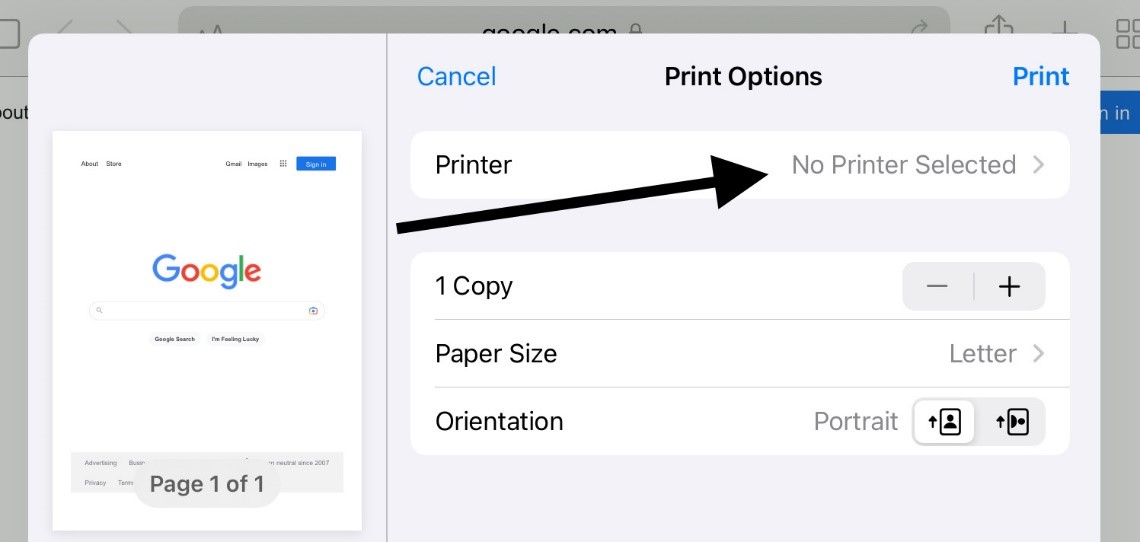
Select printer “FollowMe-BW”
If prompted enter your district username (not email address) and password
Step 3
Choose print options and select “Print”.
Any printer in the district equipped with a barcode scanner can be used with a student ID to release the print job.

-
Technology Cleaning
Technology Cleaning
If you are wondering how to clean your student’s iPad, case, laptop, or other personal device at home to prevent the spread of viruses, such as the COVID-19 virus consider the following tips below:
Do's
- Do use only a soft, lint-free cloth (microfiber cloth material).
- Do unplug all external power sources, devices, and cables before cleaning.
- Apple recommends using a 70% isopropyl alcohol wipe or Clorox Disinfecting Wipes on their products. These items can also be used to clean the display, keyboards, or other exterior surfaces
Don't
- Don't Use abrasive cloths, towels, paper towels, or similar items
- Don't excessively wipe, which could cause damage to iPad and/or case.
- Don’t let moisture get into any open spots on the iPad (ex. headphone jack, charging port, etc.)
- Don’t use aerosol sprays (ex. Lysol), bleach, or abrasives on any device.
- Don’t spray cleaners directly onto the iPad and/or case –spray on cloth first then wipe on device.
- Don’t submerge your iPad in any cleaning agents.
- Do not use bleach on any device. Do not use cleaning agents or bleach on fabric or leather surfaces such as your iPad case.
App Guides & Resources
-
Outlook Email Setup
Outlook
The District uses Microsoft Outlook for email.
To access your email though the app follow the setup below.
You can also check your email on the web. Web Outlook E-mail: Go to www.marshfieldschools.org > Go to My Apps > Click Outlook
iPad Outlook App:
- Find and tap the Outlook App
- Verify your email address displays, tap "Add Account"
- Open the "Microsoft Authenticator" App
- Enter your Password
- You are now logged into email!
-
Setup FaceTime
Setup FaceTime
- Tap the Facetime App
- Tap Continue to the "Center Stage" pop up
- Sign in with your district email
- Students use: @my.marshfieldschools.org
- Staff use: @marshfieldschools.org
- Tap Sign In
- Tap Continue to the Popup redirecting to Microsoft Office
- enter your district password
- Tap "Sign in"
- Go through Microsoft Authenticator steps if prompted
To Make a Call
- Tap "New FaceTime"
- Enter in email address or phone number of the person you are trying to contact
- To contact another student or teacher on Facetime, you must use their district email address
- You can call other apple devices using phone numbers while connected to Wi-Fi
- Tap the "Facetime" button at the bottom of the New Facetime to video call or click the phone icon to make an audio call
-
Teams: How to Login and Join Teams Meeting
Miscellaneous Guides & Resources
-
Backing up OneDrive Files
- If you have access to a computer the easiest solution is to download the files/folders, you intend to keep to that
 computer or a flash drive.
 - Room 62, curricular computer labs, personal/home computer
- Via the iPad you can move multiple files and folders easily using the “files” app to a personal Google Drive
- Sign into personal Google Drive account via the Google Drive app first
- If you have access to a computer the easiest solution is to download the files/folders, you intend to keep to that
-
Backing up Google Drive Files
- Moving Google Drive items to another Google account is the best way to preserve formatting and the easiest way to
 move items
 - “Share” items with your personally created Google account
- Once “shared” go to the personal account and select the item(s) or folder(s) to “Make a Copy”
- This step is essential to create copies that will not be removed when your district account is removed
- Moving Google Drive items to another Google account is the best way to preserve formatting and the easiest way to
-
Planning for Graduation
-
Translating Chromebook & Laptops/Traducir Chromebooks y portátiles
Click the link to view Translating Chromebooks & Laptops (English)
Haga clic en el enlace para ver Traducir Chromebooks y Laptops (español)
-
Hotspot Information
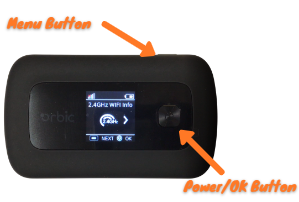
1. Turn on the Device
- Push and hold the Power Button until you see “Welcome” displayed on the screen, then release the power button
- The power button is located on the front of the device.
2. Connect iPad to Hotspot Wi-Fi
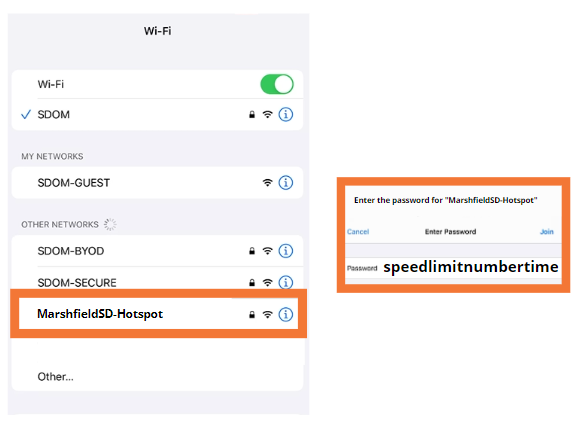
- On the ipad: Settings > Wi-Fi > Under Networks Tap "MarshfieldSD-Hotspot" > Enter password "speedlimitnumbertime" > tap Join


